Time flies, and another LFNW is upon us. I haven't fully decompressed from attending my first OpenStack Summit but now I have to switch gears and get ready for LFNW.
This year I'm giving 3 presentations, one of which is a 80 minute session that I'm sharing with a good friend -- a repeat of a popular session we did last year. Here is a link to the sessions:
LFNW is a free event with good quality sessions given by good quality people. The "hallway track" is just as valuable as the other tracks as you can build lasting relationships with the tech movers and shakers of the area.
This will be something like my 10th year going. I hope to see some of you there too!
Tuesday, April 23, 2013

Monday, February 18, 2013
Documenting python code using sphinx and github
Documentation is good right? Doesn't everybody like to have a good source of documents when working with a piece of software? I know I sure do. But creating documentation can be a drag, and creating pretty documentation can be even more of a drag, more time consuming than writing the code in the first place. Ain't nobody got time for that!
Thankfully there are utilities out there that will help with creating documentation. My language of choice is Python and for generating documentation I like to use Sphinx. Sphinx appeals to me because much of the documentation can be auto-generated based on existing code. It works with python docstrings in a way that can be PEP257 compatible. It takes very little setup to get from nothing to decent looking documentation. For an example of what sphinx output can look like, see my pyendeavor project.
The first step is to make frequent use of docstrings in the code. Not only will this help to generate useful documentation later, but it is also really handy for anybody working with the code to understand what the code is doing. A docstring is a string literal that occurs as the first statement in a module, function, class, or method definition. It's more than just a comment, because it will become an attribute of the object itself. When I look at a function or a class init I ask 3 main questions:
Those three lines answer the question pretty well, and if we were just going to look at the code and not try to generate html/pdf/whatever documentation we could be done. Instead lets try to give it a little more structure, structure that sphinx will appreciate:
A human reading this docstring is still going to know what's going on pretty well, and sphinx is going to read it even better:
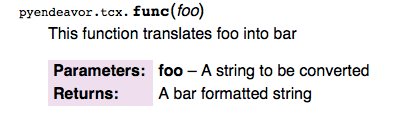
The python source files themselves service as input to the documentation creation tool. Just go about the business of writing code and keep the docstrings flowing and updated with changes and very useful documentation can be produced.
How does one generate the documentation though? How does one use sphinx? I'm glad you asked! Sphinx has a utility that can help get started -- sphinx-apidoc. First make a docs/ subdir of the project (or whatever you want to call it). This is where some sphinx control files will go, although the rendered output doesn't necessarily have to go there. For my example software pyendeavor I have a single python package, pyendeavor, located in the src/pyendeavor directory. To get started with sphinx, I would issue the command:
The F causes a full setup to happen, the -o docs tells sphinx to direct it's output to the newly created docs directory, and the src/ tells sphinx to look in src/ for my modules.
Sphinx uses reStructuredText as the input format, which is pretty easy to work with. And if we look at the files it generated for us, we'll see that there isn't much there:
And if we look in the pyendevor file we'll see more, but here is a snippit:
This just tells sphinx to read the module files and generate content for module members, undocumented members, and to follow inheritance. These are all just commands that sphinx understands, but you don't really have to.
There is a conf.py file that will need some attention. Sphinx will need to know how to import the code, so a system path entry to where the code can be found needs to be added. There is a helpful comment near the top, just clear the hash and update the path:
Now we are ready to make some content! Make sure to be in the docs/ dir and run make. A list of possible make targets will be displayed, but the we care about is 'html', so run that one:
Lots of output, but the end result is some html pages in _build/html/ :
A browser can be used to view index.html and all the linked docs. How awesome! Useful documentation without having to do much more than just use docstrings in the code (which should be done anyway).
Now that docs can be generated, they should be put somewhere useful. That's where the github part of this post comes in. A lot of projects are posted on github and I've started using it for more of mine too. One nice feature is a way to create a webspace for a project by pushing content to a 'gh-pages' branch of a project. These following steps will help setup a repo to have a place to publish the html content of sphinx. They are based on the directions I found here, however instead of using a directory outside our project space we're going to make use of a git workdir so that we never have to leave the project directory to get things done.
First lets create a directory to hold our new branch from the top level of our source.
Next create a new workdir named html within that directory:
(More information about git-new-workdir can be found here but essentially it is a way to create a subdirectory that can be checked out to a new branch, but all the git content will be linked. A git fetch in the topdir of the clone will also update the git content in the workdir path. No need for multiple pulls.)
Now we have to prepare the workdir for sphinx content. To do this we need to create an empty gh-pages branch within the html directory:
Initially there will be a copy of the source tree in the html directory that can be blown away with:
Back in the docs/ directory a change needs to be made to the Makefile to tell it to output content to where we want it, the gh-pages/html/ directory. Look for:
and change it to
Now from the docs/ directory, run make html again. This time you'll notice that the output goes to ../gh-pages/html/
Switching back to that directory the files can be added and committed with:
Now the branch can be pushed to github:
After upwards to 10 minutes later the pages site for the repo can be visited, like mine for pyendeavor. Github also has a feature for README files in the base of your repo, supporting/rendering markdown and reStructuredText. This README.rst file can also be included in your pages output with a simple tweak to the index.rst file in docs/. The ..include directive will tell sphinx to include the content from the README.rst file when generating html output:
The README.rst file source can be seen here. The same content of the README file will display in the generated docs, updating this content only has to happen once.
It is a good idea to add the control files in docs/ to the repository and keep them under source control:
If new modules or packages are added to the source tree then a new run of sphinx-apidoc is necessary. The -f flag will tell sphinx that it is OK to overwrite the existing files:
When functions change or new docstrings are added to the code new html content needs to be generated by running make html and committing/pushing the new content in the gh-pages/html/ directory.
That's all there is to it, sphinx generated docs rendered by github via the gh-pages branch. All within a single directory tree. Have fun, and get to documenting!
Thankfully there are utilities out there that will help with creating documentation. My language of choice is Python and for generating documentation I like to use Sphinx. Sphinx appeals to me because much of the documentation can be auto-generated based on existing code. It works with python docstrings in a way that can be PEP257 compatible. It takes very little setup to get from nothing to decent looking documentation. For an example of what sphinx output can look like, see my pyendeavor project.
The first step is to make frequent use of docstrings in the code. Not only will this help to generate useful documentation later, but it is also really handy for anybody working with the code to understand what the code is doing. A docstring is a string literal that occurs as the first statement in a module, function, class, or method definition. It's more than just a comment, because it will become an attribute of the object itself. When I look at a function or a class init I ask 3 main questions:
- What does this code do?
- What are the inputs to it?
- What will I get in return?
def func(foo):

    """This function translates foo into bar

    The input is a foo string
    the output is a bar string
    """
Those three lines answer the question pretty well, and if we were just going to look at the code and not try to generate html/pdf/whatever documentation we could be done. Instead lets try to give it a little more structure, structure that sphinx will appreciate:
def func(foo):

    """This function translates foo into bar

    :param foo: A string to be converted
    :returns: A bar formatted string
    """
A human reading this docstring is still going to know what's going on pretty well, and sphinx is going to read it even better:
The python source files themselves service as input to the documentation creation tool. Just go about the business of writing code and keep the docstrings flowing and updated with changes and very useful documentation can be produced.
How does one generate the documentation though? How does one use sphinx? I'm glad you asked! Sphinx has a utility that can help get started -- sphinx-apidoc. First make a docs/ subdir of the project (or whatever you want to call it). This is where some sphinx control files will go, although the rendered output doesn't necessarily have to go there. For my example software pyendeavor I have a single python package, pyendeavor, located in the src/pyendeavor directory. To get started with sphinx, I would issue the command:
$ sphinx-apidoc -A "Jesse Keating" -F -o docs src/
The F causes a full setup to happen, the -o docs tells sphinx to direct it's output to the newly created docs directory, and the src/ tells sphinx to look in src/ for my modules.
$ sphinx-apidoc -F -o docs src/
Creating file docs/pyendeavor.rst.
Creating file docs/conf.py.
Creating file docs/index.rst.
Creating file docs/Makefile.
Creating file docs/make.bat.
$ ls docs/
Makefile       _static        conf.py        make.bat
_build         _templates     index.rst      pyendeavor.rst
Sphinx uses reStructuredText as the input format, which is pretty easy to work with. And if we look at the files it generated for us, we'll see that there isn't much there:
$ cat docs/index.rst
.. src documentation master file, created by
   sphinx-quickstart on Mon Feb 18 17:44:53 2013.
   You can adapt this file completely to your liking, but it should at least
   contain the root `toctree` directive.

Welcome to src's documentation!
===============================

Contents:

.. toctree::
   :maxdepth: 4

   pyendeavor

Indices and tables
==================

* :ref:`genindex`
* :ref:`modindex`
* :ref:`search`
And if we look in the pyendevor file we'll see more, but here is a snippit:
:mod:`pyendeavor` Package
-------------------------

.. automodule:: pyendeavor
    :members:
    :undoc-members:
    :show-inheritance:

:mod:`api` Module
-----------------

.. automodule:: pyendeavor.api
    :members:
    :undoc-members:
    :show-inheritance:
This just tells sphinx to read the module files and generate content for module members, undocumented members, and to follow inheritance. These are all just commands that sphinx understands, but you don't really have to.
There is a conf.py file that will need some attention. Sphinx will need to know how to import the code, so a system path entry to where the code can be found needs to be added. There is a helpful comment near the top, just clear the hash and update the path:
sys.path.insert(0, os.path.abspath('/Users/jkeating/src/pyendeavor/src/'))
Now we are ready to make some content! Make sure to be in the docs/ dir and run make. A list of possible make targets will be displayed, but the we care about is 'html', so run that one:
$ make html

sphinx-build -b html -d _build/doctrees   . _build/html

Making output directory...
Running Sphinx v1.1.3
loading pickled environment... not yet created
building [html]: targets for 2 source files that are out of date
updating environment: 2 added, 0 changed, 0 removed
reading sources... [100%] pyendeavor
looking for now-outdated files... none found
pickling environment... done
checking consistency... done
preparing documents... done
writing output... [100%] pyendeavor
writing additional files... (5 module code pages) _modules/index
 genindex py-modindex search
copying static files... WARNING: html_static_path entry '/Users/jkeating/src/pyendeavor/docs/_static' does not exist
done
dumping search index... done
dumping object inventory... done
build succeeded, 1 warning.

Build finished. The HTML pages are in _build/html.
Lots of output, but the end result is some html pages in _build/html/ :
$ ls _build/html/
_modules         genindex.html    py-modindex.html searchindex.js
_sources         index.html       pyendeavor.html
_static          objects.inv      search.html
A browser can be used to view index.html and all the linked docs. How awesome! Useful documentation without having to do much more than just use docstrings in the code (which should be done anyway).
Now that docs can be generated, they should be put somewhere useful. That's where the github part of this post comes in. A lot of projects are posted on github and I've started using it for more of mine too. One nice feature is a way to create a webspace for a project by pushing content to a 'gh-pages' branch of a project. These following steps will help setup a repo to have a place to publish the html content of sphinx. They are based on the directions I found here, however instead of using a directory outside our project space we're going to make use of a git workdir so that we never have to leave the project directory to get things done.
First lets create a directory to hold our new branch from the top level of our source.
$ mkdir gh-pages
Next create a new workdir named html within that directory:
$ /usr/local/share/git-core/contrib/workdir/git-new-workdir . gh-pages/html
(More information about git-new-workdir can be found here but essentially it is a way to create a subdirectory that can be checked out to a new branch, but all the git content will be linked. A git fetch in the topdir of the clone will also update the git content in the workdir path. No need for multiple pulls.)
Now we have to prepare the workdir for sphinx content. To do this we need to create an empty gh-pages branch within the html directory:
$ cd gh-pages/html
$ git checkout --orphan gh-pages
Initially there will be a copy of the source tree in the html directory that can be blown away with:
$ git rm -rf .
Back in the docs/ directory a change needs to be made to the Makefile to tell it to output content to where we want it, the gh-pages/html/ directory. Look for:
BUILDDIR = _build
and change it to
BUILDDIR = ../gh-pages/html
Now from the docs/ directory, run make html again. This time you'll notice that the output goes to ../gh-pages/html/
Switching back to that directory the files can be added and committed with:
$ git add .
$ git commit -am 'Initial checkin of sphinx generated docs'
Now the branch can be pushed to github:
$ git push -u origin gh-pages
After upwards to 10 minutes later the pages site for the repo can be visited, like mine for pyendeavor. Github also has a feature for README files in the base of your repo, supporting/rendering markdown and reStructuredText. This README.rst file can also be included in your pages output with a simple tweak to the index.rst file in docs/. The ..include directive will tell sphinx to include the content from the README.rst file when generating html output:
Welcome to pyendeavor's documentation!
======================================
.. include:: ../README.rst

Contents:
The README.rst file source can be seen here. The same content of the README file will display in the generated docs, updating this content only has to happen once.
It is a good idea to add the control files in docs/ to the repository and keep them under source control:
docs/Makefile
docs/conf.py
docs/*.rst
docs/make.bat
If new modules or packages are added to the source tree then a new run of sphinx-apidoc is necessary. The -f flag will tell sphinx that it is OK to overwrite the existing files:
$ sphinx-apidoc -f -o docs/ src/
When functions change or new docstrings are added to the code new html content needs to be generated by running make html and committing/pushing the new content in the gh-pages/html/ directory.
That's all there is to it, sphinx generated docs rendered by github via the gh-pages branch. All within a single directory tree. Have fun, and get to documenting!
Tuesday, February 12, 2013
Python magic and remote APIs
I'm a pretty big fan of Python as a programming language. It allows me to program by discovery, that is poke and prod at things until the work. Not having to compile an entire program every time I change something is pretty fantastic, as is the ability to insert a debug statement and be able to break a program at that point, then run arbitrary python code within that context. Pretty indispensable to how I write software.
Another thing I like about Python, which some may not, is the ability to do magic things. Not quite so magic as xkcd would like us to believe, but fun stuff indeed.
Recently one of the services at work grew a json API to bang against, and for fun I thought I'd whip up some python to play with it. My team had a few utility scripts that would bang on the old xmlrpc interface to get some data, I wanted to see how much faster it was with json.
First, if you have to do anything web stuff, you really should be using the Requests module. It is so, so much better than using urllib(2) directly.
The API I wanted to program against had an Auth end point that would return to you a token string. This string could be included with later API calls to provide authentication. Requests lets you create a session object that can have attributes that carry on to all web calls, such as a custom auth header with a token.
Now the session object can be used just like requests itself, and it'll include the new header we've added. While this was neat at first, I quickly realized that I wanted to make this session object an attribute of a more generic object for working with the API. Each time you use session or requests you have to fill in a url and that's tedious, so I made a python class to handle that for me. One bit of magic I used here was a python property.
A python property is a way populate a class attribute on the fly / as needed without the code using your object needing to know that it's happening behind the scenes. It's a getter/setter without having to get and set, and it caches the value for future getting. My class sets some data during the init process, and creates a property for the session attribute, which can then be used in later functions, like a login or query function.
With this structure we can do things like:
We get back a json blob that has what the API returned to us. What happened was that the query function built up the information for the requests bit, which was passed into self.session.post(). Since this was the first time trying to access self.session we went through the @property tagged session() function. That function determined that self._session was not populated yet and called _auth(). _auth() in turn did the login dance to generate the token, built up a requests.Session object, tweaked the header and stuffed it into self._session. session() then returned that to the caller thus delivering the actual session object. Magic! The next time session is accessed it will quickly return the value of self._session. Properties are awesome and useful.
A CServ() object is okay, but not useful on its own. If I wanted to get a bit of data about a computer and use that data numerous times I'd either have to store a copy of the data in a local variable, or do queries each time I wanted the data. Neither are efficient. What I really want is to be able to create a Computer object, and from that object access attributes directly, like say Computer.name. Here is where some more magic comes in. We already know we can create properties to back attributes. We could go find out what all possible things we could look up about a computer in our CServ service, then write out properties for each of those. That... doesn't sound fun. Particularly if you think about this CServ having Computer items, Switch items, Account items, etc... That would be a lot of typing!
What if instead there was a way to do dynamic properties? What if when we tried to access Computer.primary_ip the code would just know to do a query to look up the 'primary_ip' attribute of a Computer.Computer cserv API class? Well we're in luck, because there is a way!
First we're going to create a subclass of CServ, CServOBJ. This class will be a base class for any number of objects, like Computers, Accounts, etc.. We can save a lot of code duplication by putting the shared bits in CServOBJ.
Right now we don't need to overload the __init__ method, so we can dive right into the magic. In python, when you attempt to access an object's attribute, behind the scenes an object's __getattr__(attribute) method is called. Normally you don't see it because it's all built in, but we can override it to make attribute access do something different. In our case, we want to do an API look up to get the value if we don't already have it, so we'll overload the function:
Objects in python also have a built in __dict__ that keeps track of all the attributes. Our simple little bit of code will try to return the value for the name of the attribute the function gets. If that attribute doesn't exist in the built in dict, a keyerror would happen. We catch that error and call our _setAttrib() function. This function is where the look up is built up using some other class attributes we'll get to later. A session call is made and the value is fed into the setattr python built-in. All this work happens behind the scenes to the bit of code just trying to access the attribute, and the lookup only happens once. That's all we really need for now in the base class, lets create a Computer class.
That's all there is to it. _qclass is defined as a class attribute, it does not change per-object. It is the class name passed into the remote API. The object creation takes a number, which is the identifier for computers in our system. It assigns that to the number attribute so that if we reference computer.number we don't make another API call. _qval is the place holder that will be common across all the objects for what do use as a look up key. The parent class's init is called (which skips all the way up to CServ) to complete the object creation.
With this setup, we can program against it very easily to access and cache data:
MAGIC!
Now if you are like me, you spend a lot of time in things like ipython or bpython to interactively program stuff and play with objects and whatnot. These environments provide tab completion, help functions, etc... With our current code though, we couldn't tab complete the available attributes. Only the name attribute and the functions we've created would show up. To fix that, we need to overload the built in __dir__ function. This function is used when getting a listing of what is available to an object, dir(object). A useful exploratory tool. ipython/bpython use this method to see what tab completion options to provide you. Luckily our internal service provides an API call to get a listing of possible attributes, so we can hook that into __dir__. But of course we only want to do this API call once (per object) so we will want to make it a property. Since there is nothing API class specific we can put the code into the CServOBJ class:
Since we are creating a property at this level we will grow an __init__ function to prep for that. Then we define the attribs() function. A short-cut is taken here, instead of calling out to some other function to load the attributes the load is done directly. Any time a Computer object gets a dir() call our overloaded function will return a sorted list that is the combination of the built in functions/attributes, anything that has been added to the specific object, and the available API attributes. Tab-completion achieved!
This has been a quick look into some of the magic you can do with Python. It's not quite antigravity, but it is useful, and food for thought for anybody that's programming against remote APIs. Objects are good, objects with dynamic attributes are better, and tab completion is icing on the cake. Enjoy!
Another thing I like about Python, which some may not, is the ability to do magic things. Not quite so magic as xkcd would like us to believe, but fun stuff indeed.
Recently one of the services at work grew a json API to bang against, and for fun I thought I'd whip up some python to play with it. My team had a few utility scripts that would bang on the old xmlrpc interface to get some data, I wanted to see how much faster it was with json.
First, if you have to do anything web stuff, you really should be using the Requests module. It is so, so much better than using urllib(2) directly.
The API I wanted to program against had an Auth end point that would return to you a token string. This string could be included with later API calls to provide authentication. Requests lets you create a session object that can have attributes that carry on to all web calls, such as a custom auth header with a token.
resp = requests.get('https://URL/api/auth/USERNAME?password=DATA')
resp.json()
  u'LONGSTRING'
token = resp.json()
session = requests.Session()
session.headers.update({'X-Auth': token})
Now the session object can be used just like requests itself, and it'll include the new header we've added. While this was neat at first, I quickly realized that I wanted to make this session object an attribute of a more generic object for working with the API. Each time you use session or requests you have to fill in a url and that's tedious, so I made a python class to handle that for me. One bit of magic I used here was a python property.
A python property is a way populate a class attribute on the fly / as needed without the code using your object needing to know that it's happening behind the scenes. It's a getter/setter without having to get and set, and it caches the value for future getting. My class sets some data during the init process, and creates a property for the session attribute, which can then be used in later functions, like a login or query function.
class CServ(object):
    """A cservice object that we will interact with."""

    def __init__(self):
        self.API = 'URL'
        self.SessURL = self.API + 'session/'
        self.QAPI = self.API + 'query/'
        self._session = None

    def _login(self):
        username = myuser
        password = mypass
        data = {'password': password}
        r = requests.get('%sauth/%s' % (self.API, username), params=data)
        return r.json()

    @property
    def session(self):
        if not self._session:
            self._auth()
        return self._session

    def _auth(self):
        token = self._login()
        # Build up a session object with the token
        s = requests.Session()
        s.headers.update({'X-Auth': token})
        self._session = s

    def query(self, classname, load_arg, attributes=None):
        """Wrangle a query into the json interface.

        classname -- The name of the cserv api class to query against
        load_arg -- The argument to query for (can be a list)
        attributes -- an optional list of what to return

        returns jsonified results
        """

        # See if we have a list of load args to go through
        if type(load_arg) == list:
            # Build up a dict of the bits we need to pass in
            bits = []
            for arg in load_arg:
                qdict = {'class': classname, 'load_arg': arg}
                if attributes:
                    qdict['attributes'] = attributes
                bits.append(qdict)
        else:
            bits = {'class': classname, 'load_arg': load_arg}
            if attributes:
                bits['attributes'] = attributes

        data = self.session.post(self.QAPI, json.dumps(bits))
        return data.json()
With this structure we can do things like:
cserv = CServ()
cserv.query('Computer.Computer', 432807, attributes=['name'])
  [{u'count': 1, u'load_arg': 432807, u'limit': 1, u'result':
[{u'name': u'silly.hostname.here.com'}], u'offset': 0,
u'class': u'Computer.Computer'}]
We get back a json blob that has what the API returned to us. What happened was that the query function built up the information for the requests bit, which was passed into self.session.post(). Since this was the first time trying to access self.session we went through the @property tagged session() function. That function determined that self._session was not populated yet and called _auth(). _auth() in turn did the login dance to generate the token, built up a requests.Session object, tweaked the header and stuffed it into self._session. session() then returned that to the caller thus delivering the actual session object. Magic! The next time session is accessed it will quickly return the value of self._session. Properties are awesome and useful.
A CServ() object is okay, but not useful on its own. If I wanted to get a bit of data about a computer and use that data numerous times I'd either have to store a copy of the data in a local variable, or do queries each time I wanted the data. Neither are efficient. What I really want is to be able to create a Computer object, and from that object access attributes directly, like say Computer.name. Here is where some more magic comes in. We already know we can create properties to back attributes. We could go find out what all possible things we could look up about a computer in our CServ service, then write out properties for each of those. That... doesn't sound fun. Particularly if you think about this CServ having Computer items, Switch items, Account items, etc... That would be a lot of typing!
What if instead there was a way to do dynamic properties? What if when we tried to access Computer.primary_ip the code would just know to do a query to look up the 'primary_ip' attribute of a Computer.Computer cserv API class? Well we're in luck, because there is a way!
First we're going to create a subclass of CServ, CServOBJ. This class will be a base class for any number of objects, like Computers, Accounts, etc.. We can save a lot of code duplication by putting the shared bits in CServOBJ.
class CServOBJ(CServ):
    """A base CServ object class to build from"""
Right now we don't need to overload the __init__ method, so we can dive right into the magic. In python, when you attempt to access an object's attribute, behind the scenes an object's __getattr__(attribute) method is called. Normally you don't see it because it's all built in, but we can override it to make attribute access do something different. In our case, we want to do an API look up to get the value if we don't already have it, so we'll overload the function:
    def __getattr__(self, name):
        try:
            return self.__dict__[name]
        except KeyError:
            self._setAttrib(name)
            return self.__dict__[name]

    def _setAttrib(self, name):
        resp = self.session.get('%sattribute/%s/%s/%s' %
                                (self.API, self._qclass, self._qval, name))
        resp.raise_for_status()
        setattr(self, name, resp.json())
Objects in python also have a built in __dict__ that keeps track of all the attributes. Our simple little bit of code will try to return the value for the name of the attribute the function gets. If that attribute doesn't exist in the built in dict, a keyerror would happen. We catch that error and call our _setAttrib() function. This function is where the look up is built up using some other class attributes we'll get to later. A session call is made and the value is fed into the setattr python built-in. All this work happens behind the scenes to the bit of code just trying to access the attribute, and the lookup only happens once. That's all we really need for now in the base class, lets create a Computer class.
class Computer(CServOBJ):
    """A class to represent the Computer.Computer CServ API class"""

    _qclass = 'Computer.Computer'
    def __init__(self, number):
        self.number = number
        self._qval = self.number
super(Computer, self).__init__()
That's all there is to it. _qclass is defined as a class attribute, it does not change per-object. It is the class name passed into the remote API. The object creation takes a number, which is the identifier for computers in our system. It assigns that to the number attribute so that if we reference computer.number we don't make another API call. _qval is the place holder that will be common across all the objects for what do use as a look up key. The parent class's init is called (which skips all the way up to CServ) to complete the object creation.
With this setup, we can program against it very easily to access and cache data:
comp = Computer(432888)
print(comp.number)
  432888
print(comp.primary_ip)
  10.14.232.158
MAGIC!
Now if you are like me, you spend a lot of time in things like ipython or bpython to interactively program stuff and play with objects and whatnot. These environments provide tab completion, help functions, etc... With our current code though, we couldn't tab complete the available attributes. Only the name attribute and the functions we've created would show up. To fix that, we need to overload the built in __dir__ function. This function is used when getting a listing of what is available to an object, dir(object). A useful exploratory tool. ipython/bpython use this method to see what tab completion options to provide you. Luckily our internal service provides an API call to get a listing of possible attributes, so we can hook that into __dir__. But of course we only want to do this API call once (per object) so we will want to make it a property. Since there is nothing API class specific we can put the code into the CServOBJ class:
    def __init__(self):
        self._attributes = None
        super(CServOBJ, self).__init__()

    @property
    def attribs(self):
        if not self._attribs:
            self._attribs = []
            resp = self.session.get('%sattributes/%s' %
                                    (self.API, self._qclass))
            for att in resp.json():
                self._attribs.append(att[0])
        return self._attribs

    def __dir__(self):
        return sorted(dir(type(self)) + list(self.__dict__) + self.attribs)
Since we are creating a property at this level we will grow an __init__ function to prep for that. Then we define the attribs() function. A short-cut is taken here, instead of calling out to some other function to load the attributes the load is done directly. Any time a Computer object gets a dir() call our overloaded function will return a sorted list that is the combination of the built in functions/attributes, anything that has been added to the specific object, and the available API attributes. Tab-completion achieved!
This has been a quick look into some of the magic you can do with Python. It's not quite antigravity, but it is useful, and food for thought for anybody that's programming against remote APIs. Objects are good, objects with dynamic attributes are better, and tab completion is icing on the cake. Enjoy!
Monday, January 28, 2013
New blog name, new focus
I've renamed this blog to "Adventures in The Cloud". My day job is now DevOps for Rackspace's public cloud, and I'll occasionally blog about those adventures. This is where those blog posts will land.
Right now I'm still learning my way around things and finding places to help out, so not a lot to blog about yet. My first big task is a cleanup of our cloud, finding VMs that are still running that should be deleted, VMs stuck in a delete action, or VMs that aren't running any more but our DB thinks they are. There are various other clean up items I'm finding along the way. The software I'm writing to do this will likely be contributed to OpenStack upstream at some point (soon) as it'll be useful to anybody running an OpenStack based cloud. Nobody likes wasted resources!
That's all for now, back again when I have something fun to talk about.
Right now I'm still learning my way around things and finding places to help out, so not a lot to blog about yet. My first big task is a cleanup of our cloud, finding VMs that are still running that should be deleted, VMs stuck in a delete action, or VMs that aren't running any more but our DB thinks they are. There are various other clean up items I'm finding along the way. The software I'm writing to do this will likely be contributed to OpenStack upstream at some point (soon) as it'll be useful to anybody running an OpenStack based cloud. Nobody likes wasted resources!
That's all for now, back again when I have something fun to talk about.
Monday, November 26, 2012
Hanging up the Hat
Seven years ago I put on a Red Hat. I had been a part of the
community for a few years prior to that as well, first as a newbie in
#redhat looking for help, later as somebody providing help to others,
then as an early cabal member in the newly formed Fedora project, later
as a leader of Fedora Legacy. Along the way I've made some very strong
friendships that I hope will continue.
This is my last week as a Red Hatter.
I'd like to think that the Fedora project is a better place now than when I joined. I hope my time here has made a positive difference. My new role will leave me with less time to participate directly in Fedora, although I will likely continue maintaining a few packages here and there for my personal use.
I do plan on being at FUDCon in January, I hope to see many of you there.
I'll likely be shutting down this particular blog this week, but a new one will start and I'll link to it from here if you really like me and wish to keep tabs on what I'm doing :)
This is my last week as a Red Hatter.
I'd like to think that the Fedora project is a better place now than when I joined. I hope my time here has made a positive difference. My new role will leave me with less time to participate directly in Fedora, although I will likely continue maintaining a few packages here and there for my personal use.
I do plan on being at FUDCon in January, I hope to see many of you there.
I'll likely be shutting down this particular blog this week, but a new one will start and I'll link to it from here if you really like me and wish to keep tabs on what I'm doing :)
Friday, October 12, 2012
Text Mode for Fedora 18
Anaconda has been through a pretty major UI rewrite. Anybody that has tried either Fedora 18 Alpha or any of the nightly images since then should be well aware of this.
The UI rewrite was done for many reasons and accomplishes many goals. I'm not going to rehash that here. What I am going to talk about is what happened to text mode.
Text mode in F17 and before was ncurses based. This gave some kind of pretty UI to do things. There were drawbacks though. ncurses didn't work on all the terminals people throw at Anaconda, in particular dumb serial terminals and x3270, the terminal for s390x. Because of that we also had a (non-interactive) very simple display mode called 'cmdline'. This just did simple line printing of progress during a kickstart. Unfortunately due to the way the old UI was coded there wasn't a good complete separation of presentation from computation so many things were written 3 times. Once for gui, once for text, and once for cmdline. Fun right?
With Fedora 18 there is one text UI. It is used on full featured consoles as well as dumb ones. It doesn't use ncurses, it just uses simple line printing. It can be used over serial (interactively!) and over x3270 (non-interactively). It is a simple question and answer prompt.
The design of text mode for F18 and beyond is closely modelled after the design of the GUI for F18 and beyond. A hub and a set of spokes, so that users can do tasks in whatever order they wish, potentially while things happen in the background. There is a main setup hub where the user can set a time zone, set a root password, and do some basic storage configuration (pick target disks and a strategy to clear space on those disks). Once all tasks are complete the user can progress into the actual installation where we just throw up a running list of tasks the backend is accomplishing.
There are very few things you can do with text mode in Fedora 18. You cannot pick languages, and you cannot pick installation source. These can be provided via boot time arguments. You also cannot do advanced storage configuration which would need a kickstart file to accomplish via "text mode". We are planning to add some functionality for Fedora 19, but we haven't decided which items and how rich those items will be. Text mode is still de-emphasized in favor of direct GUI or remote GUI by way of VNC. For kickstarts however text mode is still pretty great. The minimal UI does not prevent a fully customized kickstart from being executed.
Give text mode a spin! It's simple, fast, unobtrusive, and gets the job done.
The UI rewrite was done for many reasons and accomplishes many goals. I'm not going to rehash that here. What I am going to talk about is what happened to text mode.
Text mode in F17 and before was ncurses based. This gave some kind of pretty UI to do things. There were drawbacks though. ncurses didn't work on all the terminals people throw at Anaconda, in particular dumb serial terminals and x3270, the terminal for s390x. Because of that we also had a (non-interactive) very simple display mode called 'cmdline'. This just did simple line printing of progress during a kickstart. Unfortunately due to the way the old UI was coded there wasn't a good complete separation of presentation from computation so many things were written 3 times. Once for gui, once for text, and once for cmdline. Fun right?
With Fedora 18 there is one text UI. It is used on full featured consoles as well as dumb ones. It doesn't use ncurses, it just uses simple line printing. It can be used over serial (interactively!) and over x3270 (non-interactively). It is a simple question and answer prompt.
The design of text mode for F18 and beyond is closely modelled after the design of the GUI for F18 and beyond. A hub and a set of spokes, so that users can do tasks in whatever order they wish, potentially while things happen in the background. There is a main setup hub where the user can set a time zone, set a root password, and do some basic storage configuration (pick target disks and a strategy to clear space on those disks). Once all tasks are complete the user can progress into the actual installation where we just throw up a running list of tasks the backend is accomplishing.
There are very few things you can do with text mode in Fedora 18. You cannot pick languages, and you cannot pick installation source. These can be provided via boot time arguments. You also cannot do advanced storage configuration which would need a kickstart file to accomplish via "text mode". We are planning to add some functionality for Fedora 19, but we haven't decided which items and how rich those items will be. Text mode is still de-emphasized in favor of direct GUI or remote GUI by way of VNC. For kickstarts however text mode is still pretty great. The minimal UI does not prevent a fully customized kickstart from being executed.
Give text mode a spin! It's simple, fast, unobtrusive, and gets the job done.
Thursday, October 11, 2012
Just in case you were wondering...
I've just made the Fedora 18 installer work well on s390x again. You know, for the 10s of you out there that care.
You're welcome.
You're welcome.
Root password in Fedora 18
As part of the Anaconda UI redesign, we had hoped to offload root password setting to the installed host. We had envisioned a scenario where the installer locked the root account and post-install software such as Firstboot or Gnome Initial Experience would take care of adding a user to the system and marking that user as a "super" user. This would obviate the need for a root password, as the super user could use sudo to accomplish admin tasks.
That's how things looked prior to Fedora 18 Alpha, but in testing it became apparent that we couldn't always count on Firstboot or GIE to set things up right, or even be present.
This was particularly true of text mode, where the only packages installed was the bare minimal set. So first text mode grew a password spoke, and we made it mandatory.
Then I wrote a password spoke for GUI mode which lived in the main setup hub. For Alpha this was an optional spoke and it defaulted to a locked root account. Some thought was put into flipping the optional vs mandatory state based on install data, such as whether or not Firstboot was selected for install. Part of being able to do that was moving the spoke from the main setup hub to the install (or configuration) hub. If it lives in this hub we should have finalized data about what packages were selected for install. However doubts arose as to whether "part of the payload" was enough data to ensure that Firstboot or GIE actually ran and we were worried we could still lead users into being locked out of their freshly installed system.
So, for Beta, I've just pushed a set of changes that will make the password spoke a mandatory spoke. You must visit the spoke before you can complete the install. You can still mark the root account as disabled, just by leaving the password fields blank, but you do so at your own risk. This configuration is likely to remain for Fedora 18.
That's how things looked prior to Fedora 18 Alpha, but in testing it became apparent that we couldn't always count on Firstboot or GIE to set things up right, or even be present.
This was particularly true of text mode, where the only packages installed was the bare minimal set. So first text mode grew a password spoke, and we made it mandatory.
Then I wrote a password spoke for GUI mode which lived in the main setup hub. For Alpha this was an optional spoke and it defaulted to a locked root account. Some thought was put into flipping the optional vs mandatory state based on install data, such as whether or not Firstboot was selected for install. Part of being able to do that was moving the spoke from the main setup hub to the install (or configuration) hub. If it lives in this hub we should have finalized data about what packages were selected for install. However doubts arose as to whether "part of the payload" was enough data to ensure that Firstboot or GIE actually ran and we were worried we could still lead users into being locked out of their freshly installed system.
So, for Beta, I've just pushed a set of changes that will make the password spoke a mandatory spoke. You must visit the spoke before you can complete the install. You can still mark the root account as disabled, just by leaving the password fields blank, but you do so at your own risk. This configuration is likely to remain for Fedora 18.
Thursday, June 7, 2012
11 files changed, 87 insertions(+), 97 deletions(-)
I've just posted my largest change to the installer code base yet. This pile of changes moves some functionality out of the installer itself and into the pre-exec environment of dracut and systemd.
For a while now, anaconda has had the ability to fire up an sshd server in the install environment. It's useful to be able to ssh into the system as it's being installed and poke around on the shell. Doubly useful when doing remote installs of headless systems. Required for doing installs on systems that have crap for a (remote) console like s390x.
Anaconda had 2 ways of bringing up sshd, on s390x a replacement for /sbin/init would get ran and bring up the sshd server automatically. But on other arches it was up to anaconda itself to bring up the ssh server, if the "sshd" boot option was encountered. Along with the sshd boot argument there was a kickstart argument "sshpw" that would get handled to set a password for the user(s) who could log in via ssh. Of course, s390x couldn't make use of this because sshd was started prior to anaconda, and in fact, anaconda wouldn't start until somebody ssh'd in as the "install" user. Hurray for differences!
Now that we've got systemd bringing things up and anaconda isn't "init" any more , it's just a service and target, we can do some fun things. We can create our own anaconda-sshd.service to go along with our own sshd config specific to anaconda. We can use a systemd generator to look for "inst.sshd" boot argument (all anaconda boot args were renamed to start with inst. in F17) or s390x arch and if found make the anaconda-sshd.service be a part of the anaconda.target. The anaconda-sshd.service makes use of an ExecStartPre script to parse the "sshpw" kickstart line (if it exists) and setup users/passwords accordingly, before sshd itself is brought up.
This accomplishes a few goals:
For a while now, anaconda has had the ability to fire up an sshd server in the install environment. It's useful to be able to ssh into the system as it's being installed and poke around on the shell. Doubly useful when doing remote installs of headless systems. Required for doing installs on systems that have crap for a (remote) console like s390x.
Anaconda had 2 ways of bringing up sshd, on s390x a replacement for /sbin/init would get ran and bring up the sshd server automatically. But on other arches it was up to anaconda itself to bring up the ssh server, if the "sshd" boot option was encountered. Along with the sshd boot argument there was a kickstart argument "sshpw" that would get handled to set a password for the user(s) who could log in via ssh. Of course, s390x couldn't make use of this because sshd was started prior to anaconda, and in fact, anaconda wouldn't start until somebody ssh'd in as the "install" user. Hurray for differences!
Now that we've got systemd bringing things up and anaconda isn't "init" any more , it's just a service and target, we can do some fun things. We can create our own anaconda-sshd.service to go along with our own sshd config specific to anaconda. We can use a systemd generator to look for "inst.sshd" boot argument (all anaconda boot args were renamed to start with inst. in F17) or s390x arch and if found make the anaconda-sshd.service be a part of the anaconda.target. The anaconda-sshd.service makes use of an ExecStartPre script to parse the "sshpw" kickstart line (if it exists) and setup users/passwords accordingly, before sshd itself is brought up.
This accomplishes a few goals:
- ssh bring up is the same on s390x vs other arches
- passwords are configurable for s390x just like other arches
- anaconda code doesn't have to deal with service bring up
- gets us closer to s390x bring up without having to replace init
- results in net-negative code in the repository
Wednesday, May 30, 2012
Using Thunderbird Efficiently
I get a lot of email. Some of it I even respond to. A lot of it I would like to respond to it, or follow up on it in some way at some point in time, just not immediately. I don't have all of my email being dumped into a single folder, and I use multiple email accounts too. What do I do?
I needed a setup that would allow me to:
Tags kinda work, but an IMAP server might not support them, and thus you wouldn't be able to share tags across clients. The next option is marking a message as "Starred".
A star seems to be well supported by IMAP servers, and across the clients I was playing with. This solves the "Mark messages for follow up" problem. Thunderbird conveniently has a keyboard short cut, 's', to toggle a message's starred state.
The next requirement was getting a quick look at the things I needed to follow up on. Thunderbird can search your messages, and you can include the starred state in the query. Further, you can save your search as a folder for convenient access. See this article for how to setup a saved search. I'll spare you the details here.
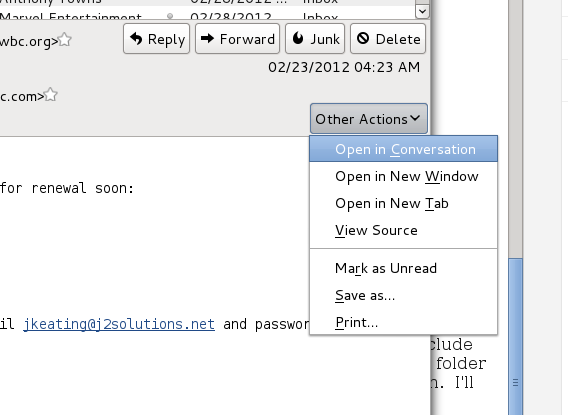
Now that I've got a folder I can click on to see what needs to be followed up on, I need to get context for those messages. Right now I'm just looking at a flat list of starred messages, no thread details. Enter a lovely feature: "Open in Conversation".
This is an extremely useful feature for me. Not only will it open up a new tab (which is awesome by the way), it'll populate that tab with a threaded view of all the mails related to that starred mail. All the mails. That includes my own replies.
In a multi-pronged thread with multiple participants, one can quickly lose context as to what's been replied to and what hasn't. Being able to see my own replies intermixed with the rest of the thread is pretty awesome.
Now, if you're following along at home and have noticed that your "Open in Conversation" menu entry is greyed out, fear not! This feature depends on the "Global Search and Indexer" being enabled.
If this isn't enabled, enabling it will spike your CPU for a bit as TB gathers information about all your mail. After that initial hit, I haven't noticed any performance overhead.
--
So that's how I stay on top of my email. It keeps me efficient, and lessens the likelihood of something falling through the cracks. A friend who's been a TB user for years wasn't aware of this feature and after describing it to him I realized other people might not be aware, so here ya go!
Happy Emailing!
I needed a setup that would allow me to:
- Mark messages in a way to follow up later
- Get a quick look at all the messages I've marked for follow up
- Have that quick look work across multiple folders/accounts
- Be able to get context for the message, including my replies
 | ||
| Tags |
 |
| Star me! |
The next requirement was getting a quick look at the things I needed to follow up on. Thunderbird can search your messages, and you can include the starred state in the query. Further, you can save your search as a folder for convenient access. See this article for how to setup a saved search. I'll spare you the details here.
Now that I've got a folder I can click on to see what needs to be followed up on, I need to get context for those messages. Right now I'm just looking at a flat list of starred messages, no thread details. Enter a lovely feature: "Open in Conversation".
 |
| These conversations kill |
 |
| See you in Hell! |
Now, if you're following along at home and have noticed that your "Open in Conversation" menu entry is greyed out, fear not! This feature depends on the "Global Search and Indexer" being enabled.
 |
| My name is Gloda |
--
So that's how I stay on top of my email. It keeps me efficient, and lessens the likelihood of something falling through the cracks. A friend who's been a TB user for years wasn't aware of this feature and after describing it to him I realized other people might not be aware, so here ya go!
Happy Emailing!
Tuesday, May 22, 2012
Well I've been waiting for this moment for all my life...
I can feel it coming in the Air tonight...
Excuse me a moment whilst I rock out to a killer electronic drum riff.
still there? Ok.
I've had a Macbook Air for a while now, not the original air, but the first redesign of it (sadly just before they did another redesign with a better chipset and backlit keyboard, oh well). When I first got it, I went a little crazy, and setup a triple boot system, OS X, Windows (Vista), and Fedora. Sadly, Fedora didn't work so hot. There were graphics issues, sound issues, touchpad issues, wireless issues, I mean, I think the issues had issues.
So instead of fighting all those issues, I did something even more silly. I found a virt software set in OSX that would allow me to attach a real partition to the guest. I setup a virtual disk image to do a minimal install of Fedora in, then edited the grub config so that it would actually load up the real disk partition as /. This actually worked, surprisingly well. I spent most the time in OSX with various X11 applications ran through ssh, and of course ssh'd into the guest to do all my command line work. It still felt dirty though. I would also let the guest boot up into graphical mode and make that go full screen in OSX Lion, which gave the illusion of using Linux native on the hardware. The upside was that the touchpad worked pretty well, and there weren't network issues. Video still sucked, no gnome-shell for me.
When I picked out the Air, I was thinking that it would be nice to have some hardware that was not the normal around the water cooler, so that we had a broader set of systems being used every day. I actually thought I could do something to fix issues that came up. Ha, hah. Turns out the most useful thing I could do was hand the system off to people who knew what they were doing.
Enter Super Hero mjg who decided (or got tasked with, I'm not sure which) that making Fedora work on Apple hardware like my Air was a thing he would do. And he sure did!
That's the Fedora 17 Final (RC3) Desktop Live image being installed to my Air. It couldn't have been easier. dd the iso to a USB stick, boot holding down option, plug in the stick (because I forgot to do that first) and pick the Fedora Media. Anaconda did all the right things (even when I didn't) and I now have a simple dual booting macbook.
F17 looks awesome. First time I've really used shell, and I like it. Audio works, graphics work, webcam works, touch pad (mostly) works, even the brightness and volume buttons work. I can't wait to haul it down to my local Starbucks on my bike, then show it off to my hipster friends, because you see, I was using Fedora on my Air before it was cool.
Well I've been waiting for this moment for all my life....
Excuse me a moment whilst I rock out to a killer electronic drum riff.
still there? Ok.
I've had a Macbook Air for a while now, not the original air, but the first redesign of it (sadly just before they did another redesign with a better chipset and backlit keyboard, oh well). When I first got it, I went a little crazy, and setup a triple boot system, OS X, Windows (Vista), and Fedora. Sadly, Fedora didn't work so hot. There were graphics issues, sound issues, touchpad issues, wireless issues, I mean, I think the issues had issues.
So instead of fighting all those issues, I did something even more silly. I found a virt software set in OSX that would allow me to attach a real partition to the guest. I setup a virtual disk image to do a minimal install of Fedora in, then edited the grub config so that it would actually load up the real disk partition as /. This actually worked, surprisingly well. I spent most the time in OSX with various X11 applications ran through ssh, and of course ssh'd into the guest to do all my command line work. It still felt dirty though. I would also let the guest boot up into graphical mode and make that go full screen in OSX Lion, which gave the illusion of using Linux native on the hardware. The upside was that the touchpad worked pretty well, and there weren't network issues. Video still sucked, no gnome-shell for me.
When I picked out the Air, I was thinking that it would be nice to have some hardware that was not the normal around the water cooler, so that we had a broader set of systems being used every day. I actually thought I could do something to fix issues that came up. Ha, hah. Turns out the most useful thing I could do was hand the system off to people who knew what they were doing.
Enter Super Hero mjg who decided (or got tasked with, I'm not sure which) that making Fedora work on Apple hardware like my Air was a thing he would do. And he sure did!
 |
| So you can wipe off that grin, I know where you've been |
That's the Fedora 17 Final (RC3) Desktop Live image being installed to my Air. It couldn't have been easier. dd the iso to a USB stick, boot holding down option, plug in the stick (because I forgot to do that first) and pick the Fedora Media. Anaconda did all the right things (even when I didn't) and I now have a simple dual booting macbook.
F17 looks awesome. First time I've really used shell, and I like it. Audio works, graphics work, webcam works, touch pad (mostly) works, even the brightness and volume buttons work. I can't wait to haul it down to my local Starbucks on my bike, then show it off to my hipster friends, because you see, I was using Fedora on my Air before it was cool.
Well I've been waiting for this moment for all my life....
Monday, May 21, 2012
It's a Brand New World!
It has been a few years since I was last heavily interested in how Anaconda did it's things. Having recently gotten back into it for my new role, it's kinda cool to see how much has changed.
Composing images:
buildinstall is out, lorax is in
mkintrd is out, dracut is in
Booting the installer
Loader is out, dracut is in
sysvinit/upstart is out, systemd is in
Installer Itself
Too much really to list here, I'm still trying to get a grip on it, and it's all changing again!
So I've had a fun few weeks getting used to the new way of doing things, stumbling around, mumbling about "In my day!" and waiving my cane. The reality is that these are all really cool improvements, and it's made working on changes quite a lot easier to manage. I don't like that feeling that the world has moved on while I wasn't looking, but then again, that's OK, that's what the world should do. I just get to be that New Guy again for a bit.
Composing images:
buildinstall is out, lorax is in
mkintrd is out, dracut is in
Booting the installer
Loader is out, dracut is in
sysvinit/upstart is out, systemd is in
Installer Itself
Too much really to list here, I'm still trying to get a grip on it, and it's all changing again!
So I've had a fun few weeks getting used to the new way of doing things, stumbling around, mumbling about "In my day!" and waiving my cane. The reality is that these are all really cool improvements, and it's made working on changes quite a lot easier to manage. I don't like that feeling that the world has moved on while I wasn't looking, but then again, that's OK, that's what the world should do. I just get to be that New Guy again for a bit.
Wednesday, April 18, 2012
I've seen the Future, and it involves punch cards??
I've now been working for Red Hat for roughly 6.5 years. That's a long time! I started out doing Release Engineering work for our internal Fedora project, somewhere around Fedora Core 5. One of my first tasks was to script a mass rebuild of all our packages for a new compiler and point out to people when their software failed to build. As an eager new employee I spend some time on the weekend sending out build failure reports (by hand) to one of our development mailing lists, and a funny thing happened. The CEO of the company (at the time Matthew Szulik) replied to one of my reports directly to me, saying that he was pleased to see somebody else burning the weekend hours. The C, E, Freaking, O! How cool was that??
Fast forward a release or two and now I'm helping to move Fedora out of Red Hat and into the world at large as a "Community Driven" project. Basically get our sources and build system to where more than just Red Hat employees can touch. This required a lot of careful thought, planning, and political smooth talking but we made it happen. A great group of engineers and managers all saw the greater potential for Fedora if we could just free it from the Mother Ship and worked very hard to convince other people and create software and infrastructure to make it happen. My role changed a bit at that time from just another release engineer to more of a group leader, a group of volunteers who wanted to help out with the tasks related to getting a Fedora release made.
Fast forward again a larger number of releases and we'll get to about 2 years ago. A FUDCon was about to start in "Toronto" CA and a big group of folks were on a chartered bus riding from "Boston" to the FUDCon event. As geeks do when stuck in a small space around other geeks, we talked about geeky things. The geeky thing that had been on my mind for a while now was trying to get Fedora sources moved out of an aging CVS based setup with buildsystem integration by way of various data files and Makefiles onto something a bit more.... modern. Anybody paying any sort of attention to source control systems in the past few years will have noticed a sharp uptick in the adoption of a new source control system called git. We desperately wanted to use git to manage Fedora package sources, and I desperately wanted to use something other than Makefiles to interact with the system and so we spent a good part of that ride throwing ideas around. Certainly not the first time we've done this, but something happened to click on that ride and half a plan was formed. There certainly is something magical about getting a group of people together and then removing a lot of the outside distraction, just to see what kind of awesome can be cooked up.
For the next 2 years or so I worked on first getting Fedora moved into git and replacing Makefiles with a python library and application, followed by doing the same for a much more complicated internal setup at Red Hat for all of Red Hat's products. The work on the latter is now (mostly) done and I had to make a decision. Did I want to keep working on Release Engineering type stuff, as I had for the previous 6.5~ years, or was I ready for something new? I certainly felt ready for something new. There is nothing wrong with releng work, I quite enjoyed it and I really liked the team I worked on, but 6 years is a long time for a geek to be focused on one type of work. So I looked around Red Hat to see if anything else was interesting to me, and I found an opportunity within the Installer team.
The Installer team primarily develops and maintains Anaconda, the software used to install Fedora and Red Hat Enterprise Linux (and it's many rebuilds) onto computers. There is a variety of other software involved, all playing supporting roles, but Anaconda is certainly the star of the show. As of Monday the 16th I've been the newest member on the Installer team.
What I'll be doing there is still being worked out; It depends somewhat on what interests me and what needs are there. Getting to the title of this entry, one of my first tasks is to get up to speed on IBM Z hardware (s390x). The team needs more than one person to have knowledge of how our software (installer and the OS) is brought up on these systems. I learned that even though IBM has been making new Z systems in recent years, they /still/ make use of a stack of virtual punch cards spooled into a virtual reader to allocate resources for an OS to come up. That's right, it's 2012, I'm looking into the future of my work here at Red Hat and I'm learning about punch cards. WAT?
I'll still be involved a bit with source control management for Fedora/RHEL, and may make some new features and fix bugs in the software we use to interact with git and our build systems, at least until we find a new sucker^w engineer to take on those responsibilities. But now instead of writing software that our developers make use of, I'll be writing software that our /customers/ make use of and that's both scary and very exciting!
I hope to blog a bit more often about my Adventures in Installer Land, thoughts and observations that are going to require more than 140 chars. For now, back to the punch cards!
Fast forward a release or two and now I'm helping to move Fedora out of Red Hat and into the world at large as a "Community Driven" project. Basically get our sources and build system to where more than just Red Hat employees can touch. This required a lot of careful thought, planning, and political smooth talking but we made it happen. A great group of engineers and managers all saw the greater potential for Fedora if we could just free it from the Mother Ship and worked very hard to convince other people and create software and infrastructure to make it happen. My role changed a bit at that time from just another release engineer to more of a group leader, a group of volunteers who wanted to help out with the tasks related to getting a Fedora release made.
Fast forward again a larger number of releases and we'll get to about 2 years ago. A FUDCon was about to start in "Toronto" CA and a big group of folks were on a chartered bus riding from "Boston" to the FUDCon event. As geeks do when stuck in a small space around other geeks, we talked about geeky things. The geeky thing that had been on my mind for a while now was trying to get Fedora sources moved out of an aging CVS based setup with buildsystem integration by way of various data files and Makefiles onto something a bit more.... modern. Anybody paying any sort of attention to source control systems in the past few years will have noticed a sharp uptick in the adoption of a new source control system called git. We desperately wanted to use git to manage Fedora package sources, and I desperately wanted to use something other than Makefiles to interact with the system and so we spent a good part of that ride throwing ideas around. Certainly not the first time we've done this, but something happened to click on that ride and half a plan was formed. There certainly is something magical about getting a group of people together and then removing a lot of the outside distraction, just to see what kind of awesome can be cooked up.
For the next 2 years or so I worked on first getting Fedora moved into git and replacing Makefiles with a python library and application, followed by doing the same for a much more complicated internal setup at Red Hat for all of Red Hat's products. The work on the latter is now (mostly) done and I had to make a decision. Did I want to keep working on Release Engineering type stuff, as I had for the previous 6.5~ years, or was I ready for something new? I certainly felt ready for something new. There is nothing wrong with releng work, I quite enjoyed it and I really liked the team I worked on, but 6 years is a long time for a geek to be focused on one type of work. So I looked around Red Hat to see if anything else was interesting to me, and I found an opportunity within the Installer team.
The Installer team primarily develops and maintains Anaconda, the software used to install Fedora and Red Hat Enterprise Linux (and it's many rebuilds) onto computers. There is a variety of other software involved, all playing supporting roles, but Anaconda is certainly the star of the show. As of Monday the 16th I've been the newest member on the Installer team.
What I'll be doing there is still being worked out; It depends somewhat on what interests me and what needs are there. Getting to the title of this entry, one of my first tasks is to get up to speed on IBM Z hardware (s390x). The team needs more than one person to have knowledge of how our software (installer and the OS) is brought up on these systems. I learned that even though IBM has been making new Z systems in recent years, they /still/ make use of a stack of virtual punch cards spooled into a virtual reader to allocate resources for an OS to come up. That's right, it's 2012, I'm looking into the future of my work here at Red Hat and I'm learning about punch cards. WAT?
I'll still be involved a bit with source control management for Fedora/RHEL, and may make some new features and fix bugs in the software we use to interact with git and our build systems, at least until we find a new sucker^w engineer to take on those responsibilities. But now instead of writing software that our developers make use of, I'll be writing software that our /customers/ make use of and that's both scary and very exciting!
I hope to blog a bit more often about my Adventures in Installer Land, thoughts and observations that are going to require more than 140 chars. For now, back to the punch cards!
Subscribe to:
Posts (Atom)